如何在Spring Boot中注入自己的组件
@Configuration、@Bean
- 在之前使用Spring 的时候,我们想要注入一个组件,需要先在resource目录下创建一个xml文件,例如我们想注入两个Bean对象,按照之前的方式:
public class User {

    private String name;
    private Integer age;

    public User(String name,Integer age){
        this.name = name;
        this.age = age;
    }

    // 省略get、set方法
}

public class Pet {

    private String name;
    public Pet(String name) {
        this.name = name;
    }
    // 省略get、set方法
}

<bean id="haha" class="com.atguigu.boot.bean.User">
    <property name="name" value="zhangsan"></property>
    <property name="age" value="18"></property>
</bean>

<bean id="hehe" class="com.atguigu.boot.bean.Pet">
    <property name="name" value="tomcat"></property>
</bean>
- 而在Spring Boot中,只需要两个注解就可以完成。
@Configuration // 告诉SpringBoot这是一个配置类 == 配置文件
public class MyConfig {

    @Bean // 给容器中添加组件。以方法名作为组件的id。返回类型就是组件类型。返回的值,就是组件在容器中的实例
    public User user01(){
        User zhangsan = new User("zhangsan", 18);
        return zhangsan;
    }

    @Bean("tom") // 如果指定了value,则组件在容器中的实例为指定的值
    public Pet tomcatPet(){
        return new Pet("tomcat");
    }
}
- 测试:
public class MainApplication {

    public static void main(String[] args) {
        //1、返回我们IOC容器
        ConfigurableApplicationContext run = SpringApplication.run(MainApplication.class, args);

        //2、查看容器里面的组件
        String[] names = run.getBeanDefinitionNames();
        for (String name : names) {
            System.out.println(name);
        }

        //3、从容器中获取组件

        Pet tom01 = run.getBean("tom", Pet.class);

        Pet tom02 = run.getBean("tom", Pet.class);

        System.out.println("组件:"+(tom01 == tom02));


        //4、com.atguigu.boot.config.MyConfig$$EnhancerBySpringCGLIB$$51f1e1ca@1654a892
        MyConfig bean = run.getBean(MyConfig.class);
        System.out.println(bean);

        //如果@Configuration(proxyBeanMethods = true)代理对象调用方法。SpringBoot总会检查这个组件是否在容器中有。
        //保持组件单实例
        User user = bean.user01();
        User user1 = bean.user01();
        System.out.println(user == user1);
    }
}


可以看到Myconfig、user01、tom都已经注入到容器中了。这就是Spring Boot中注入组件的方式。
- 值得注意的是:在Spring 5.2.0的版本中,@Configuration 注解添加了一个proxyBeanMethods 的属性,它有两个值,true、false分别对应Full模式和Lite模式
- Full模式:保证每个@Bean方法被调用多少次返回的组件都是单实例的
- Lifte模式:每个@Bean方法被调用多少次返回的组件都是新创建的
- 最佳实践:
- 配置 类组件之间无依赖关系用Lite模式加速容器启动过程,减少判断
- 配置类组件之间有依赖关系,方法会被调用得到之前单实例组件,用Full模式
@Component、@Controller、@Service、@Repository
- 上述几个注解就不行过多解释了
- @Component:普通组件
- @Service:业务逻辑层
- @Controller:web层
- @Repository:持久层
上面的四个注解功能是一样的,都可以用来创建bean实例。
@ComponentScan @Import
- @ComponentScan 上面讲过,用来配置包扫描路径,@SpringBootApplication注解中就包含了它,默认是启动类所在的包路径,如本示例项目中
"com.atguigu.boot" - @Import 引入其它组件,是一个类的集合,可以引入多个组件
@Import({User.class, DBHelper.class}) // 给容器中自动创建出这两个类型的组件、默认组件的名字就是全类名
@Configuration // 告诉SpringBoot这是一个配置类 == 配置文件
public class MyConfig {
    // 省略之前的代码
}
- 验证代码
@SpringBootConfiguration
public class MainApplication {

    public static void main(String[] args) {
        // 省略上面的代码
    //5、获取组件
    String[] beanNamesForType = run.getBeanNamesForType(User.class);
        System.out.println("======5、获取组件======");
        for (String s : beanNamesForType) {
            System.out.println(s);
        }

        DBHelper bean1 = run.getBean(DBHelper.class);
        System.out.println(bean1);
    }
}

如图,@Import引入了声明的组件。
@Conditional
- 条件装配:满足Conditional指定的条件,则进行组件注入
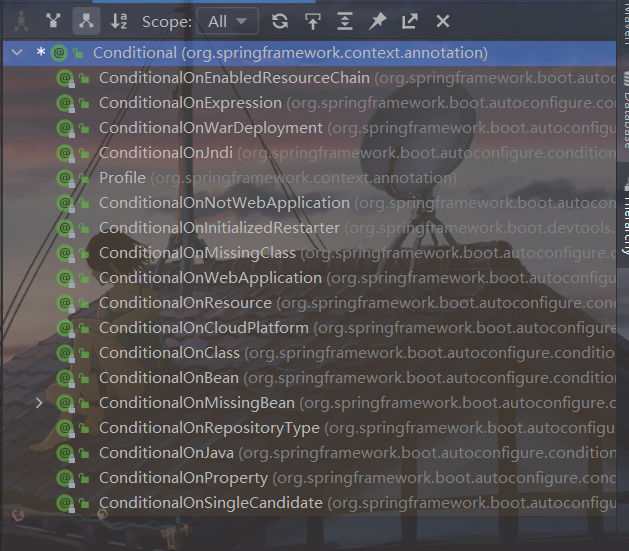
- 使用ctrl+N 查找到这个注解,ctrl+H查看继承树

- 可以看到它下面衍生出了许多的注解,如
- @ConditionalOnBean:在含有某个组件时才进行
- @ConditionalOnClass:含有某个类时才进行
- @ConditionalOnJava:当是某个Java版本时才进行
- @ConditionalOnResource:当含有某个资源文件时才进行
- ......
- 我们选择其中的@ConditionalOnBean看看效果
- 修改上面的MyConfig类
@Configuration // 告诉SpringBoot这是一个配置类 == 配置文件
public class MyConfig {

    @ConditionalOnBean(name = "tom")
    @Bean
    public User user01(){
        User zhangsan = new User("zhangsan", 18);
        return zhangsan;
    }

    // @Bean("tom")
    public Pet tomcatPet(){
        return new Pet("tomcat");
    }
}
- 测试
@SpringBootConfiguration
public class MainApplication {

    public static void main(String[] args) {
        // 删除或注释上面的代码
    // 6.@Conditional注解验证
        System.out.println("======6、@Conditional注解验证======");
        boolean tom = run.containsBean("tom");
        System.out.println("容器中Tom组件:" + tom);

        boolean user01 = run.containsBean("user01");
        System.out.println("容器中user01组件:" + user01);
    }
}

可以看到,当配置了@ConditionalOnBean(name = "tom")时,user组件也没有被注入到容器中,因为加了这个注解,意味这只有容器中存在tom 组件时user01 的@Bean才会生效。将@ConditionalOnBean(name = "tom") 修改为@ConditionalOnMissingBean(name = "tom") user01即会被注入到容器中。

- 当@@Conditional 类注解作用于方法上,只会影响到该方法的注册的组件是否成功,作用于类上面时,将会影响这个类下面所有的组件注入,这个注解及其子注解会在Spring Boot 源码中频繁使用。
@ImportResource
当改造一个老项目或者整合第三方项目时,之前已经存在了许多xml 的配置文件,不想一个个整合成对应的类,那么就可以使用@ImportResource 注解
-
导入资源注解:可以导入配置文件
-
作用:
- 在自行配置类之前,先会解析指定的配置文件资源
- 配置文件xml可以 以xml的形式配置bean对象,放到IOC中
-
测试
// bean.xml
<?xml version="1.0" encoding="UTF-8"?>
<beans xmlns="http://www.springframework.org/schema/beans"
       xmlns:xsi="http://www.w3.org/2001/XMLSchema-instance"
       xmlns:context="http://www.springframework.org/schema/context"
       xsi:schemaLocation="http://www.springframework.org/schema/beans http://www.springframework.org/schema/beans/spring-beans.xsd http://www.springframework.org/schema/context https://www.springframework.org/schema/context/spring-context.xsd">

    <bean id="haha" class="com.atguigu.boot.bean.User">
        <property name="name" value="zhangsan"></property>
        <property name="age" value="18"></property>
    </bean>

    <bean id="hehe" class="com.atguigu.boot.bean.Pet">
        <property name="name" value="tomcat"></property>
    </bean>
</beans>
// 启动类
@SpringBootConfiguration
public class MainApplication {

    public static void main(String[] args) {
        // 删除或注释上面的代码
    // 6.@Conditional注解验证
        boolean haha = run.containsBean("haha");
        boolean hehe = run.containsBean("hehe");
        System.out.println("haha:"+haha);
        System.out.println("hehe:"+hehe);
    }
}
输出:

可以看到容器中没有这两个组件
- 在MyConfig类上添加@ImportResource 注解
@Configuration // 告诉SpringBoot这是一个配置类 == 配置文件
@ImportResource("classpath:beans.xml") // 引入配置文件
public class MyConfig {

    @ConditionalOnBean(name = "tom")
    @Bean
    public User user01(){
        User zhangsan = new User("zhangsan", 18);
        return zhangsan;
    }

    // @Bean("tom")
    public Pet tomcatPet(){
        return new Pet("tomcat");
    }
}
再次执行:

可以看到容器中这两个组件成功注册到IOC容器中了。
Spring Boot配置绑定
使用Java读取到properties文件中的内容,并且把它封装到JavaBean中,以供随时使用;
Java原生方法
配置文件内容,想要把mycar的信息加载进去
server.port=8888

mycar.brand=YD
mycar.price=100000
//使用java原生代码:(比较麻烦)
public class getProperties {
    public static void main(String[] args) throws FileNotFoundException, IOException {
        Properties pps = new Properties();
    // 注意此处路径,因为该项目时聚合项目,所以需要加上子模块的名称
        pps.load(new FileInputStream("boot-01-helloworld/src/main/resources/application.properties"));
        Enumeration enum1 = pps.propertyNames();//得到配置文件的名字
        while(enum1.hasMoreElements()) {
            String strKey = (String) enum1.nextElement();
            String strValue = pps.getProperty(strKey);
            System.out.println(strKey + "=" + strValue);
            //封装到JavaBean。
        }
    }
}
输出:
mycar.price=100000
server.port=8888
debug=true
spring.banner.image.location=classpath:222.jpg
mycar.brand=YD
spring.servlet.multipart.max-file-size=10MB
@ConfigurationProperties
- 作用:绑定properties配置文件(主配置文件application.properties)中的内容,到javabean对象中
- 位置:配置类上的属性绑定
- 注意:一般会把该类放到容器中,同时使用该注解bean配置参数,该配置文件也必须注册到容器中,否则无法生效
- 使用
- 在类上加上
@ConfigurationProperties(prefix = "mycar")进行参数绑定 @Component注解把该类放到容器中
- 在类上加上
@Data
@Component
@ConfigurationProperties("mycar") // 效果与@ConfigurationProperties(prefix = "mycar")相同
public class Car {

    private String brand;
    private Integer price;
}

// 启动类
@SpringBootConfiguration
public class MainApplication {

    public static void main(String[] args) {
        // 删除或注释上面的代码
    Car bean = run.getBean("car",Car.class);
        System.out.println(bean);
    }
}
输出:
Car(brand=YD, price=100000)
- 该注解也可用于配置文件的方法上,进行组件配置的绑定。
//配置类
@Configuration
public class MyDataSourceConfig {
   @ConfigurationProperties("spring.datasource")//把配置文件的信息,绑定到返回的组件上
   @Bean
   public DataSource dataSource() {
      DruidDataSource druidDataSource = new DruidDataSource();
      //数据源的设置(这种方式写死了,最好使用配置文件的自动注入进来)
//    druidDataSource.setUrl("jdbc:mysql://localhost:3306/zhangyang?useUnicode=true&characterEncoding=utf8&serverTimezone=GMT%2B8&useSSL=false");
//    druidDataSource.setUsername("root");
//    druidDataSource.setPassword("root");
//    druidDataSource.setDriverClassName("com.mysql.cj.jdbc.Driver");
      return druidDataSource;
   }
}
@EnableConfigurationProperties
- 配置类上使用
@EnableConfigurationProperties开启某个类属性配置功能,并且把该类自动注册到容器中 - 这时候如果该类上有
@ConfigurationProperties注解,会进行自动的配置
效果同上面的相同,不再进行演示。
@Value
如果配置文件中属性比较单一,而且只在一个地方使用,那么可以使用Spring中的@Value注解,绑定Bean类的属性值
@RestController
public class HelloController {

    @Value("${mycar.brand}")
    private String carBrand;

    @GetMapping("/car")
    public String car(){
        System.out.println("carBrand:" + carBrand);
        return carBrand;
    }
}
调用接口,输出:

总结
这篇博客真是写了好久,写得太冗余了,下次得精简一下。
文笔和叙述能力还有待提高。
声明
这篇博客基于B站尚硅谷的视频:雷丰阳2021版SpringBoot2零基础入门springboot全套完整版(spring boot2)编写。
在此先表示感谢。
如有侵权,请联系我删除。

