
前言
自从使用Maven以来,一直很好奇如何将自己的依赖包上传到中央仓库供他人使用,去年十月在github开源了自己以后作为开源项目地基的common包,并上传到央仓供他人使用,最近有更新,但是换了电脑又要重头配置很多东西,之前的配置都忘了,所以在这里做个简单的记录,以便后续查阅。
创建工单申请
-
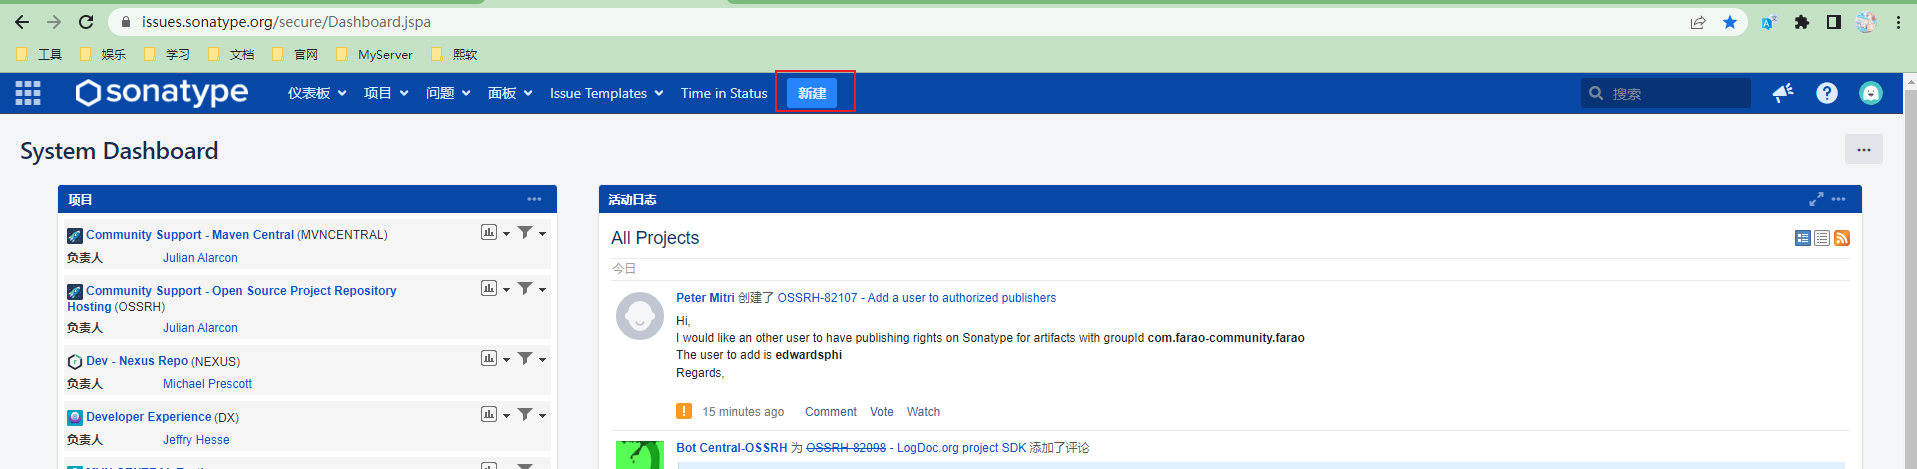
第一步创建 Sonatype 账号,进入网站 https://issues.sonatype.org/secure/Dashboard.jspa 创建一个账号
-
登录之后点击新建。
-
创建一个Issuse,填写对应的信息
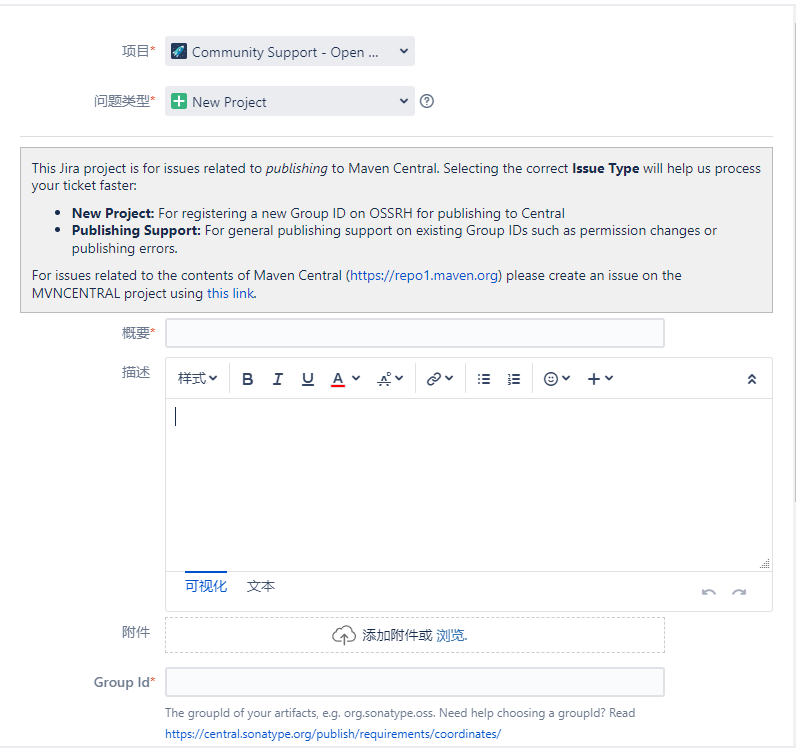
必填项:
项目选择 Community Support - Open Source Project Repository Hosting (OSSRH)
问题类型选择 New Project
概要 依赖描述
Group Id 如果有自己的域名可以填自己的域名,如 com.simplestark, 没有的话可以填github的地址 com.github.Simple-Stark (后续需要验证,不能乱填)
Project URL 项目网站链接 如 https://github.com/Simple-Stark/common-core.git
SCM url 项目源代码地址 如 https://github.com/Simple-Stark/common-core.git

其它未提到的可填可不填。
-
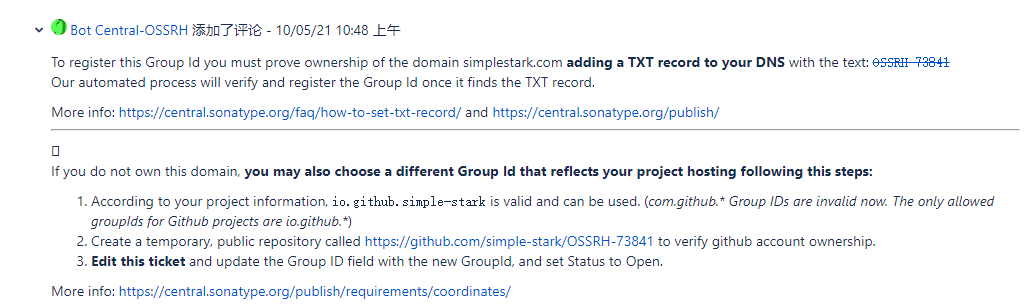
提交之后等待机器人Review,如果提供的信息没有问题,几分钟之后机器人就会添加评论
-
按照机器人的评论到自己的域名控制台添加一条txt 解析,如果是github地址的话创建一个指定的项目,从而验证域名的所有权或github账号的所有权
-
博主这里是使用的自己的域名,解析如下所示:

-
添加成功后回复机器人,告诉机器人已完成验证

-
通常几分钟之后机器人就能通过验证,等到机器人再次回复通过验证后就可以按照文档开始配置Maven了
配置Maven
-
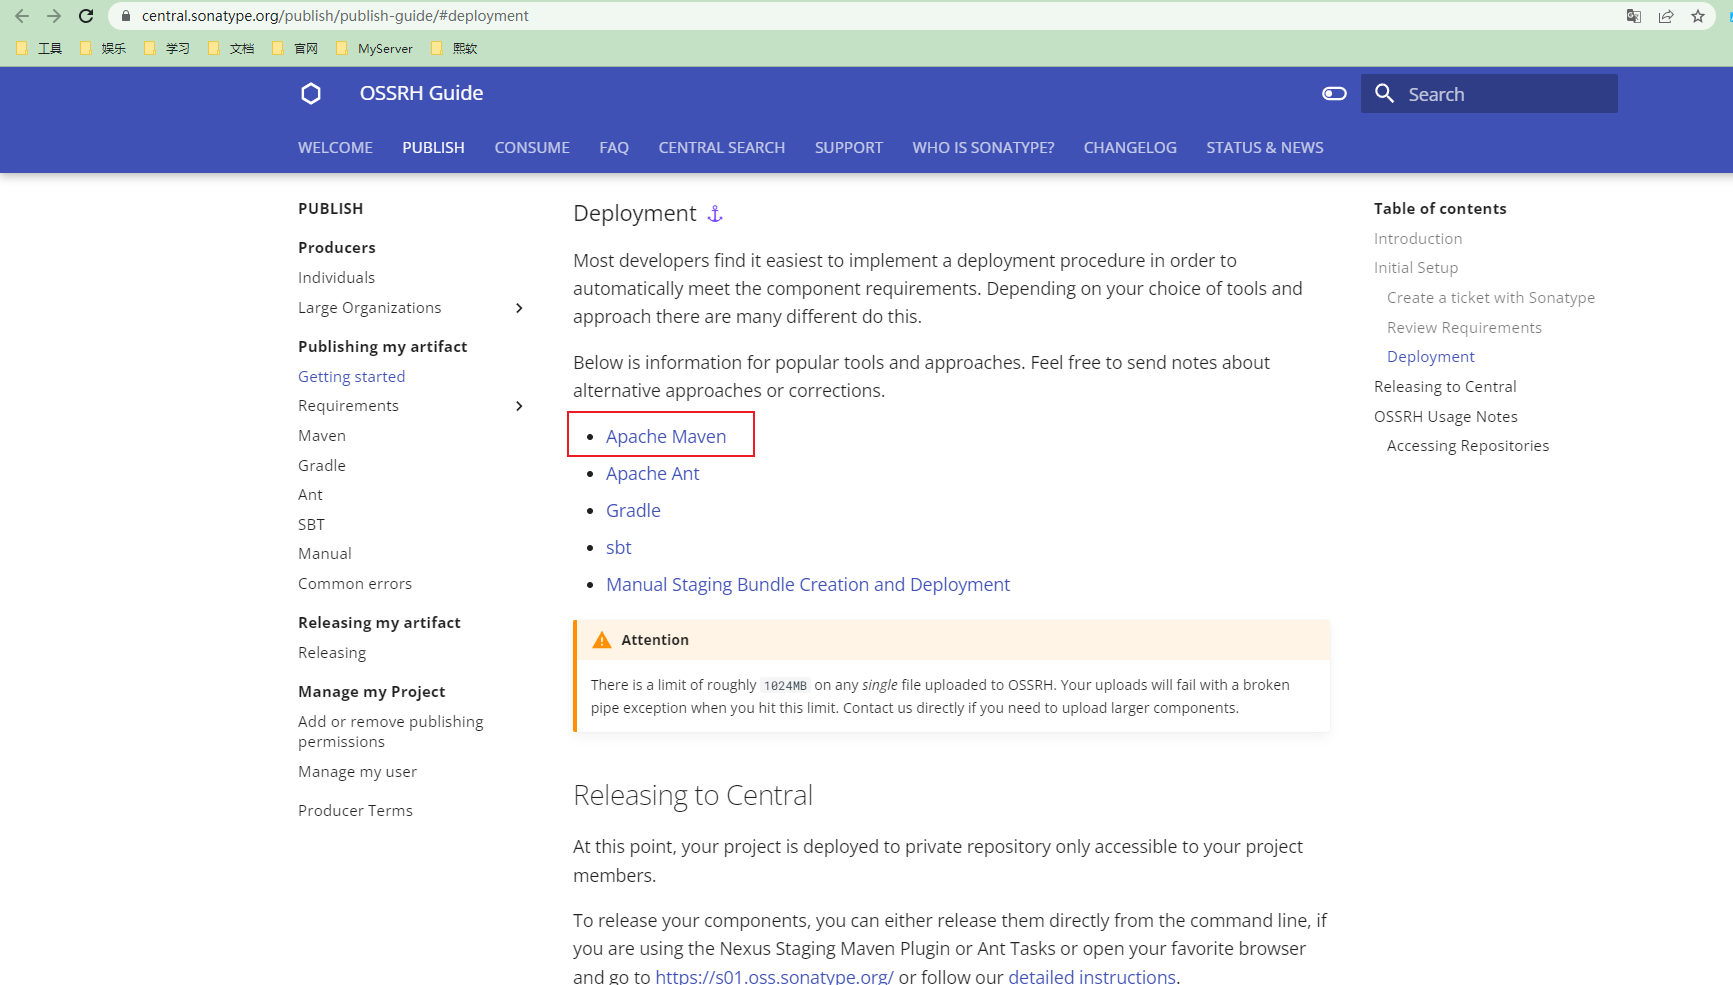
点击机器人关于部署的回复链接: https://central.sonatype.org/publish/publish-guide/#deployment 查看如何部署自己的项目
-
选择自己的部署工具,这里博主选择的是常见的Maven
-
在点进去之后,会提示一个先决条件:除了安装Maven 之外,还需要安装 Gpg 客户端,安装教程详见
Gpg配置 -
到Maven 的配置文件setting.xml文件中的
<servers>标签下配置Sonatype的账号密码
 <server>
   <id>snapshot</id>
   <username>用户名</username>
   <password>密码</password>
 </server>

 <server>
   <id>release</id>
   <username>用户名</username>
   <password>密码</password>
 </server>
- 配置OSSRH Nexus Repository Manager 央仓管理器
<!-- 仓库地址配置信息 -->
<distributionManagement>
	<snapshotRepository>
		<!--id 要与setting.xml server id一致 -->
        	<id>snapshot</id>
            <url>https://s01.oss.sonatype.org/content/repositories/snapshots</url>
    </snapshotRepository>
	<repository>
		<!--id 要与setting.xml server id一致 -->
		<id>release</id>
		<url>https://s01.oss.sonatype.org/service/local/staging/deploy/maven2</url>
	</repository>
</distributionManagement>
值得注意的是,在2021年12月后,所有的依赖将会发布到https://s01.oss.sonatype.org/ ,网上大部分的教程仍然还是之前的网址https://oss.sonatype.org/ ,会导致新申请的账号在发布过程中出现问题
- 配置 Javadoc 、 source 和 gpg 的Maven插件,其中gpg插件,将默认使用第一个列出的签名密钥,如果您需要使用特定的密钥,可以在节中添加gpg密钥的详细信息,并使用本地settings.xml配置需要使用的签名密钥(一般可忽略)。
<plugins>
  <!-- sources -->
  <plugin>
    <groupId>org.apache.maven.plugins</groupId>
    <artifactId>maven-source-plugin</artifactId>
    <version>2.2.1</version>
    <executions>
      <execution>
        <id>attach-sources</id>
        <goals>
          <goal>jar-no-fork</goal>
        </goals>
      </execution>
    </executions>
  </plugin>
  <!-- javadocs -->
  <plugin>
    <groupId>org.apache.maven.plugins</groupId>
    <artifactId>maven-javadoc-plugin</artifactId>
    <version>2.9.1</version>
    <executions>
      <execution>
        <id>attach-javadocs</id>
        <goals>
          <goal>jar</goal>
        </goals>
      </execution>
    </executions>
  </plugin>
  <!-- gpg -->
  <plugin>
    <groupId>org.apache.maven.plugins</groupId>
    <artifactId>maven-gpg-plugin</artifactId>
    <version>1.6</version>
    <executions>
      <execution>
        <id>sign-artifacts</id>
        <phase>verify</phase>
        <goals>
          <goal>sign</goal>
        </goals>
        <!--使用特定的密钥
                  <configuration>
                <keyname>${gpg.keyname}</keyname>
                <passphraseServerId>${gpg.keyname}</passphraseServerId>
              </configuration>-->
      </execution>
    </executions>
  </plugin>
</plugins>
<!-- 本地settings.xml配置需要使用的签名密钥 -->
<settings>
  <profiles>
    <profile>
      <id>ossrh</id>
      <activation>
        <activeByDefault>true</activeByDefault>
      </activation>
      <properties>
        <gpg.executable>gpg2</gpg.executable>
        <gpg.passphrase>the_pass_phrase</gpg.passphrase>
      </properties>
    </profile>
  </profiles>
</settings>
- 接着在pom.xml中完善license、scm、developer的信息:
<!-- 开源协议 -->
<licenses>
	<license>
		<name>THE GNU GENERAL PUBLIC LICENSE Version 2</name>
		<url>https://github.com/Simple-Stark/common/blob/master/LICENSE</url>
		<distribution>repo</distribution>
  	</license>
</licenses>

<!-- 托管仓库信息 -->
<scm>
	<url>https://github.com/Simple-Stark/common</url>
	<connection>https://github.com/Simple-Stark/common-core.git</connection>
	<developerConnection>https://github.com/Simple-Stark/common-core</developerConnection>
</scm>

<!--开发者信息-->
<developers>
  <developer>
    <name>SimpleStark</name>
    <email>wrh_1125@163.com</email>
    <url>https://github.com/Simple-Stark</url>
  </developer>
</developers>
- 到这里关于Maven的配置就完成了
配置Gpg
-
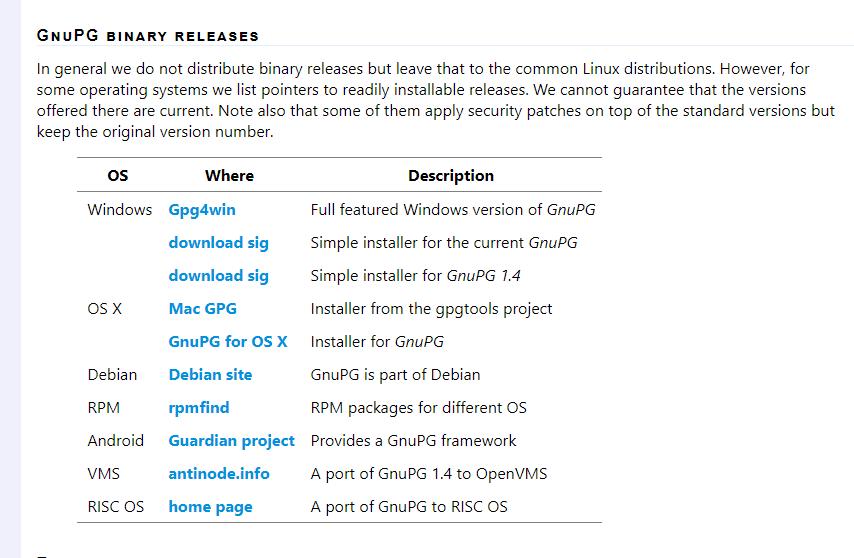
点击进入 Gpg下载链接
-
选择自己电脑对应的版本,博主这里选择的是download 需要注意的是Gpg4Win是完整版的Gpg需要收费。
-
安装成功后进入cmd 界面,参考 https://central.sonatype.org/publish/requirements/gpg/ 文档进行配置
-
进入cmd界面,验证是否安装成功
gpg --version
$ gpg --version
gpg (GnuPG) 2.2.19
libgcrypt 1.8.5
Copyright (C) 2019 Free Software Foundation, Inc.
License GPLv3+: GNU GPL version 3 or later <https://gnu.org/licenses/gpl.html>
This is free software: you are free to change and redistribute it.
There is NO WARRANTY, to the extent permitted by law.

Home: /home/mylocaluser/.gnupg
Supported algorithms:
Pubkey: RSA, ELG, DSA, ECDH, ECDSA, EDDSA
Cipher: IDEA, 3DES, CAST5, BLOWFISH, AES, AES192, AES256, TWOFISH,
   	CAMELLIA128, CAMELLIA192, CAMELLIA256
Hash: SHA1, RIPEMD160, SHA256, SHA384, SHA512, SHA224
Compression: Uncompressed, ZIP, ZLIB, BZIP2
- 生成密钥对
gpg --gen-key按照提示输入姓名和邮箱,确认无误输入O生成密钥对
$ gpg --gen-key
gpg (GnuPG) 2.2.19; Copyright (C) 2019 Free Software Foundation, Inc.
This is free software: you are free to change and redistribute it.
There is NO WARRANTY, to the extent permitted by law.

Note: Use "gpg --full-generate-key" for a full featured key generation dialog.

GnuPG needs to construct a user ID to identify your key.

Real name: Central Repo Test
Email address: central@example.com
You selected this USER-ID:
"Central Repo Test <central@example.com>"

Change (N)ame, (E)mail, or (O)kay/(Q)uit? O
We need to generate a lot of random bytes. It is a good idea to perform
some other action (type on the keyboard, move the mouse, utilize the
disks) during the prime generation; this gives the random number
generator a better chance to gain enough entropy.
We need to generate a lot of random bytes. It is a good idea to perform
some other action (type on the keyboard, move the mouse, utilize the
disks) during the prime generation; this gives the random number
generator a better chance to gain enough entropy.
gpg: key 8190C4130ABA0F98 marked as ultimately trusted
gpg: revocation certificate stored as
'/home/mylocaluser/.gnupg/openpgp-revocs.d/CA925CD6C9E8D064FF05B4728190C4130ABA0F98.rev'
public and secret key created and signed.

pub   rsa3072 2021-06-23 [SC] [expires: 2023-06-23]
   CA925CD6C9E8D064FF05B4728190C4130ABA0F98
uid                      Central Repo Test <central@example.com>
   sub   rsa3072 2021-06-23 [E] [expires: 2023-06-23]
-
注意:在确认创建的过程会有一个弹框让输入密码,输入你的密码并妥善保管,后续发布依赖时有用。
-
查看生成的密钥对
gpg --list-keys
$ gpg --list-keys

/home/mylocaluser/.gnupg/pubring.kbx
---------------------------------

pub   rsa3072 2021-06-23 [SC] [expires: 2023-06-23]
   	CA925CD6C9E8D064FF05B4728190C4130ABA0F98
uid           [ultimate] Central Repo Test <central@example.com>
sub   rsa3072 2021-06-23 [E] [expires: 2023-06-23]
- 分发密钥对到密钥服务器
gpg --keyserver keyserver.ubuntu.com --send-keys CA925CD6C9E8D064FF05B4728190C4130ABA0F98
- 可供选择的密码服务器
keyserver.ubuntu.com
keys.openpgp.org
pgp.mit.edu
- 关于Gpg的其他使用方式,可以参考Gpg的官方文档 https://wiki.gnupg.org/WKD
发布依赖
确保代码没有问题,打包测试能够通过,使用maven 命令打包发布 mvn clean deploy
idea 可以使用右侧的maven或者命令行执行
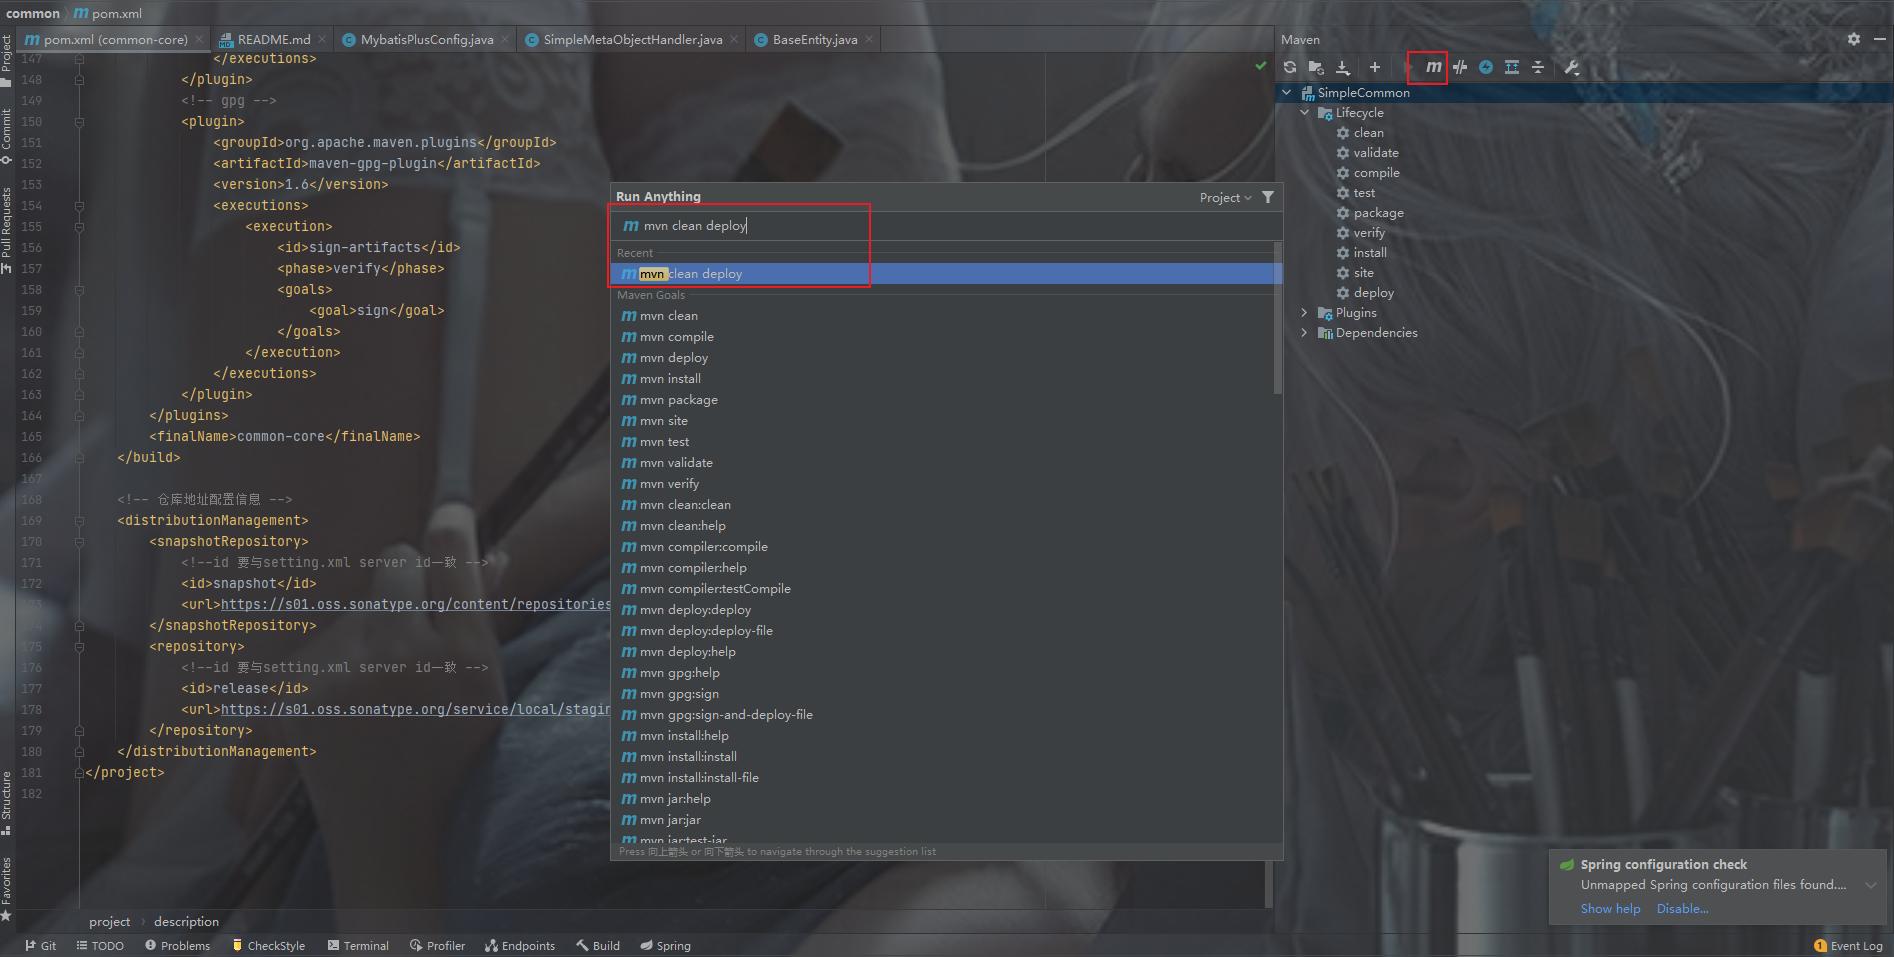
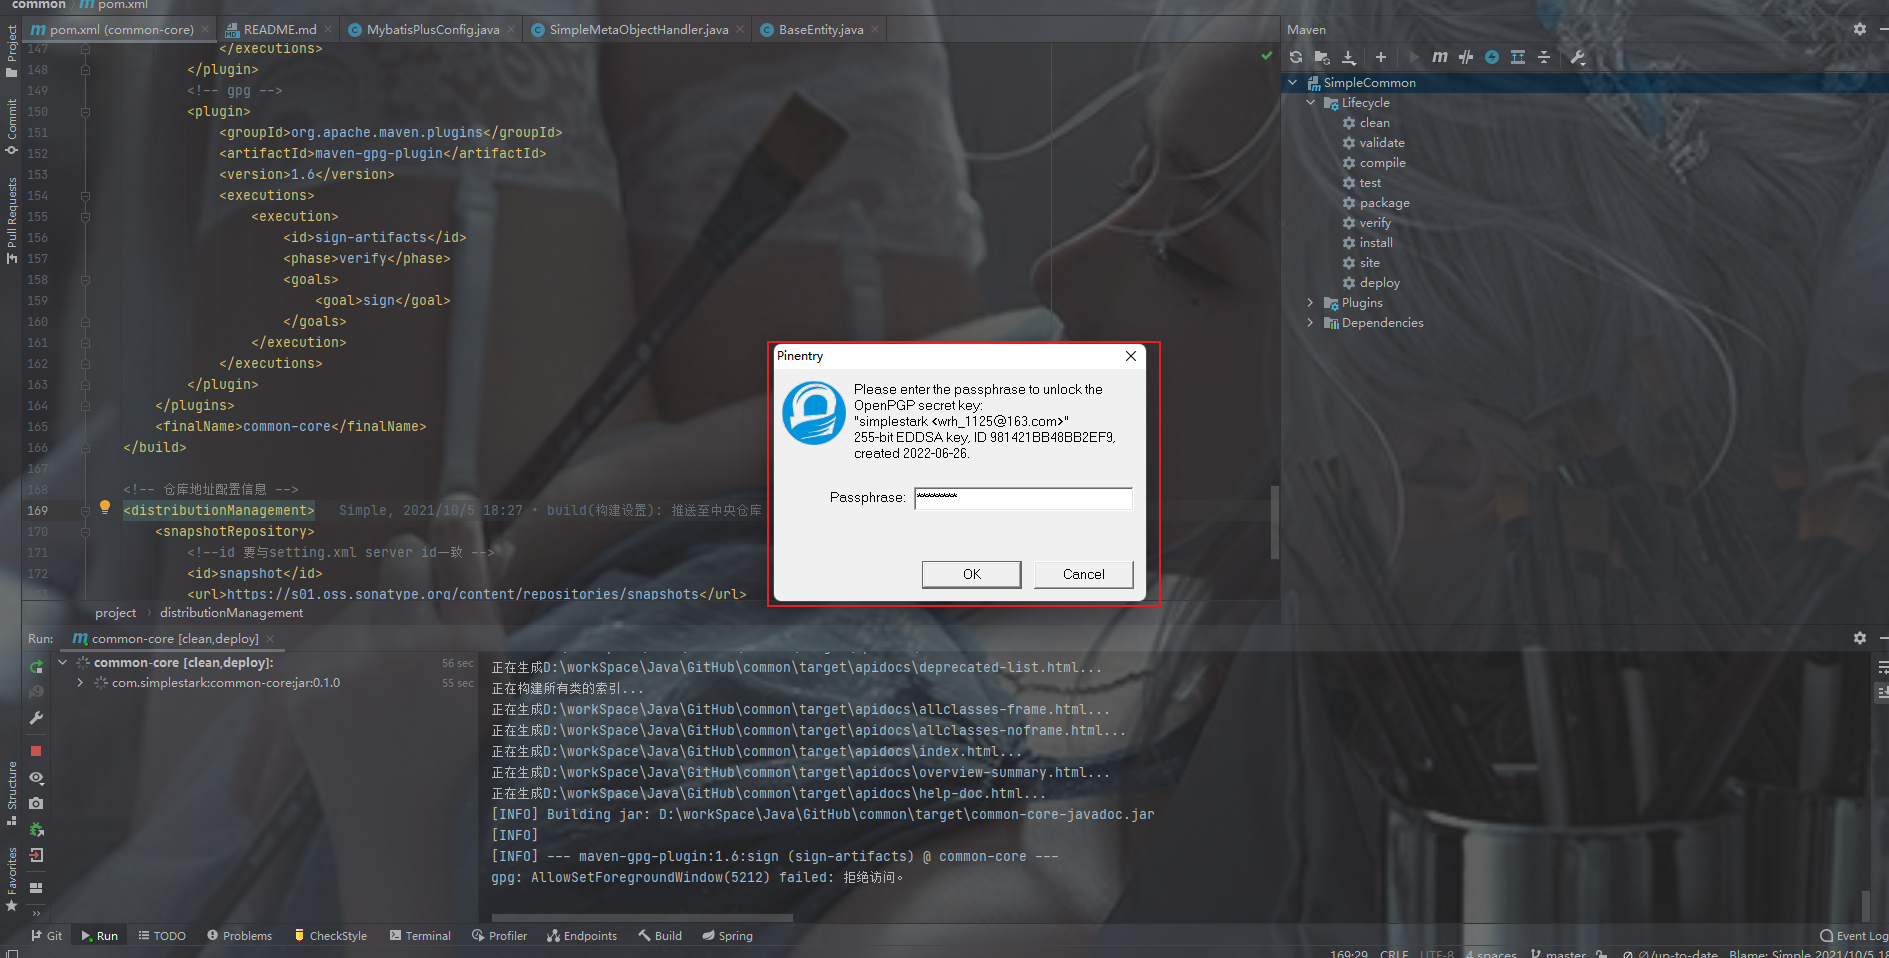
执行成功之后回弹出一个框需要输入Gpg的密码,输入后即成功发布到了Nexus Repository Manager。
以上步骤如果都没有问题,那么还没有结束,还需要到 https://s01.oss.sonatype.org 点击右上角登录在Sonatype 注册的账号密码,选择Staging Repositories
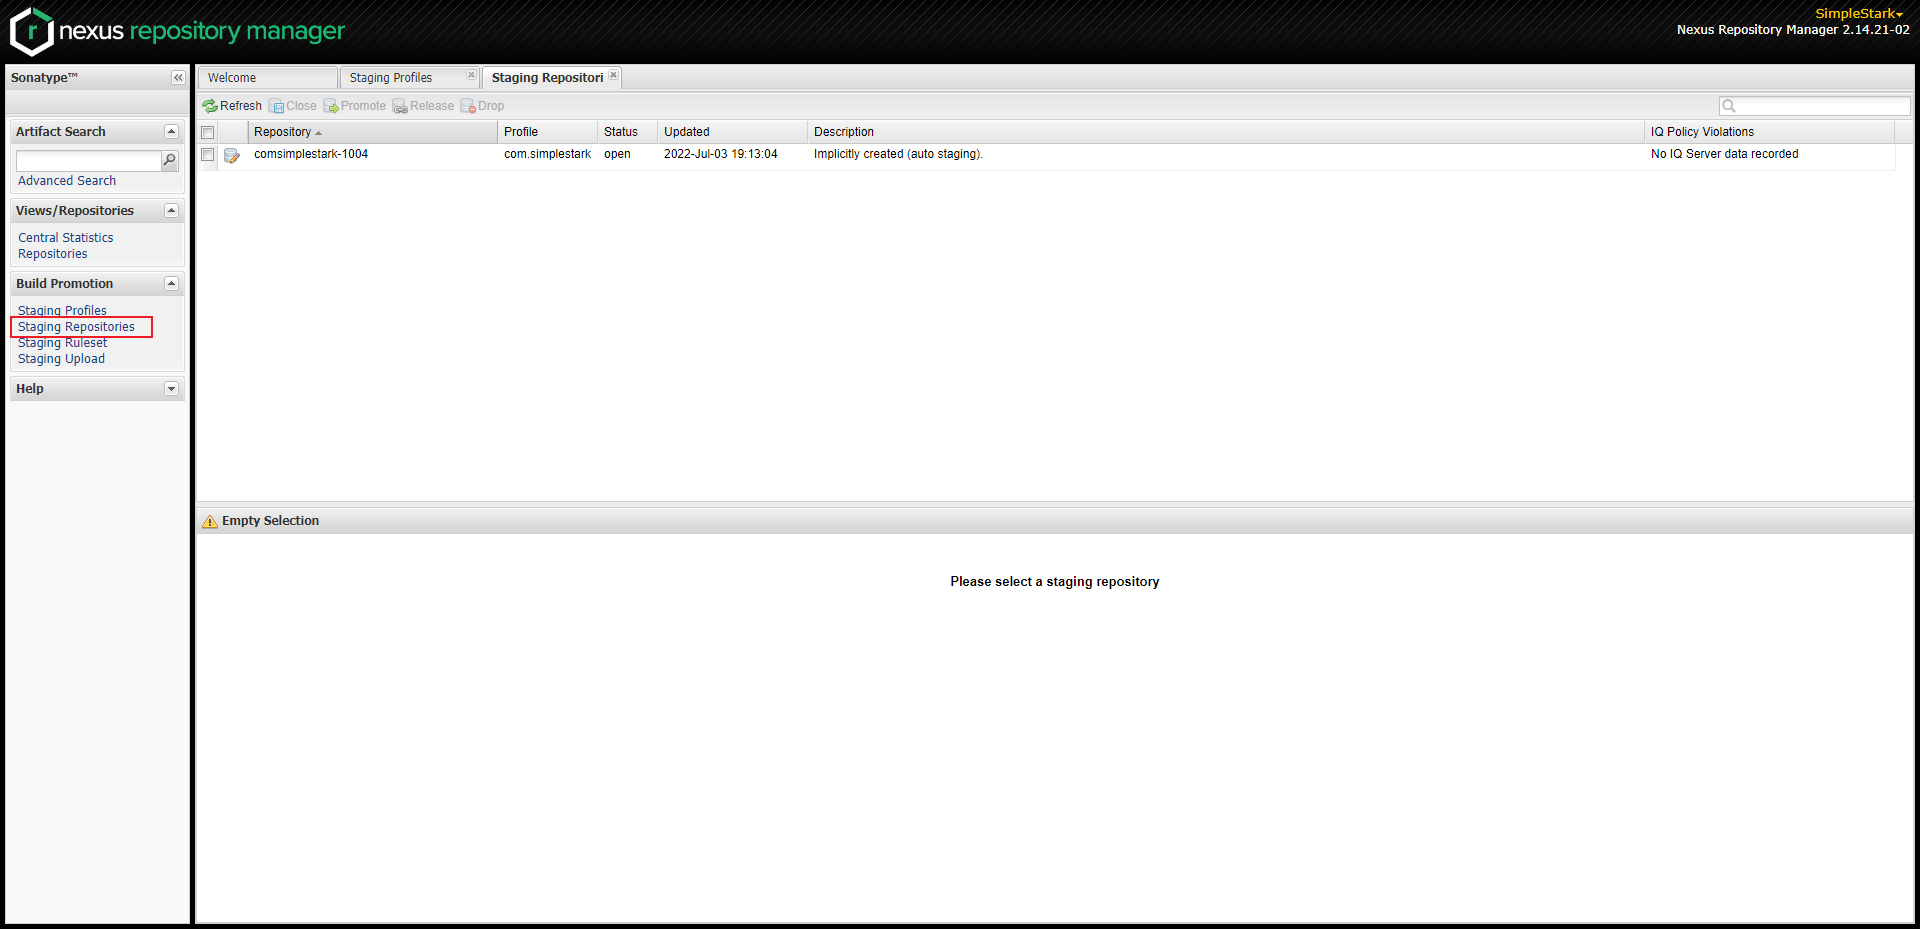
这时候执行发布操作
- 选中你发布的模块
- 点击上方的Close->Confirm
- 查看Activity的状态是否为Closed,需要等待
- 如果状态为Closed执行Release->Confirm,默认选中成功后自动删除
- 查看Activity状态,如果被删除了,说明已经发布成功
此时再查看刚开始提的Issue,可以看到机器人回复了一句话
Central sync is activated for com.simplestark. After you successfully release, your component will be published to Central https://repo1.maven.org/maven2/, typically within 30 minutes, though updates to https://search.maven.org can take up to four hours.
意思是:你已经激活了中央仓库同步。你的依赖将在30分钟左右发布到Central https://repo1.maven.org/maven2/,4小时左右更新到https://search.maven.org
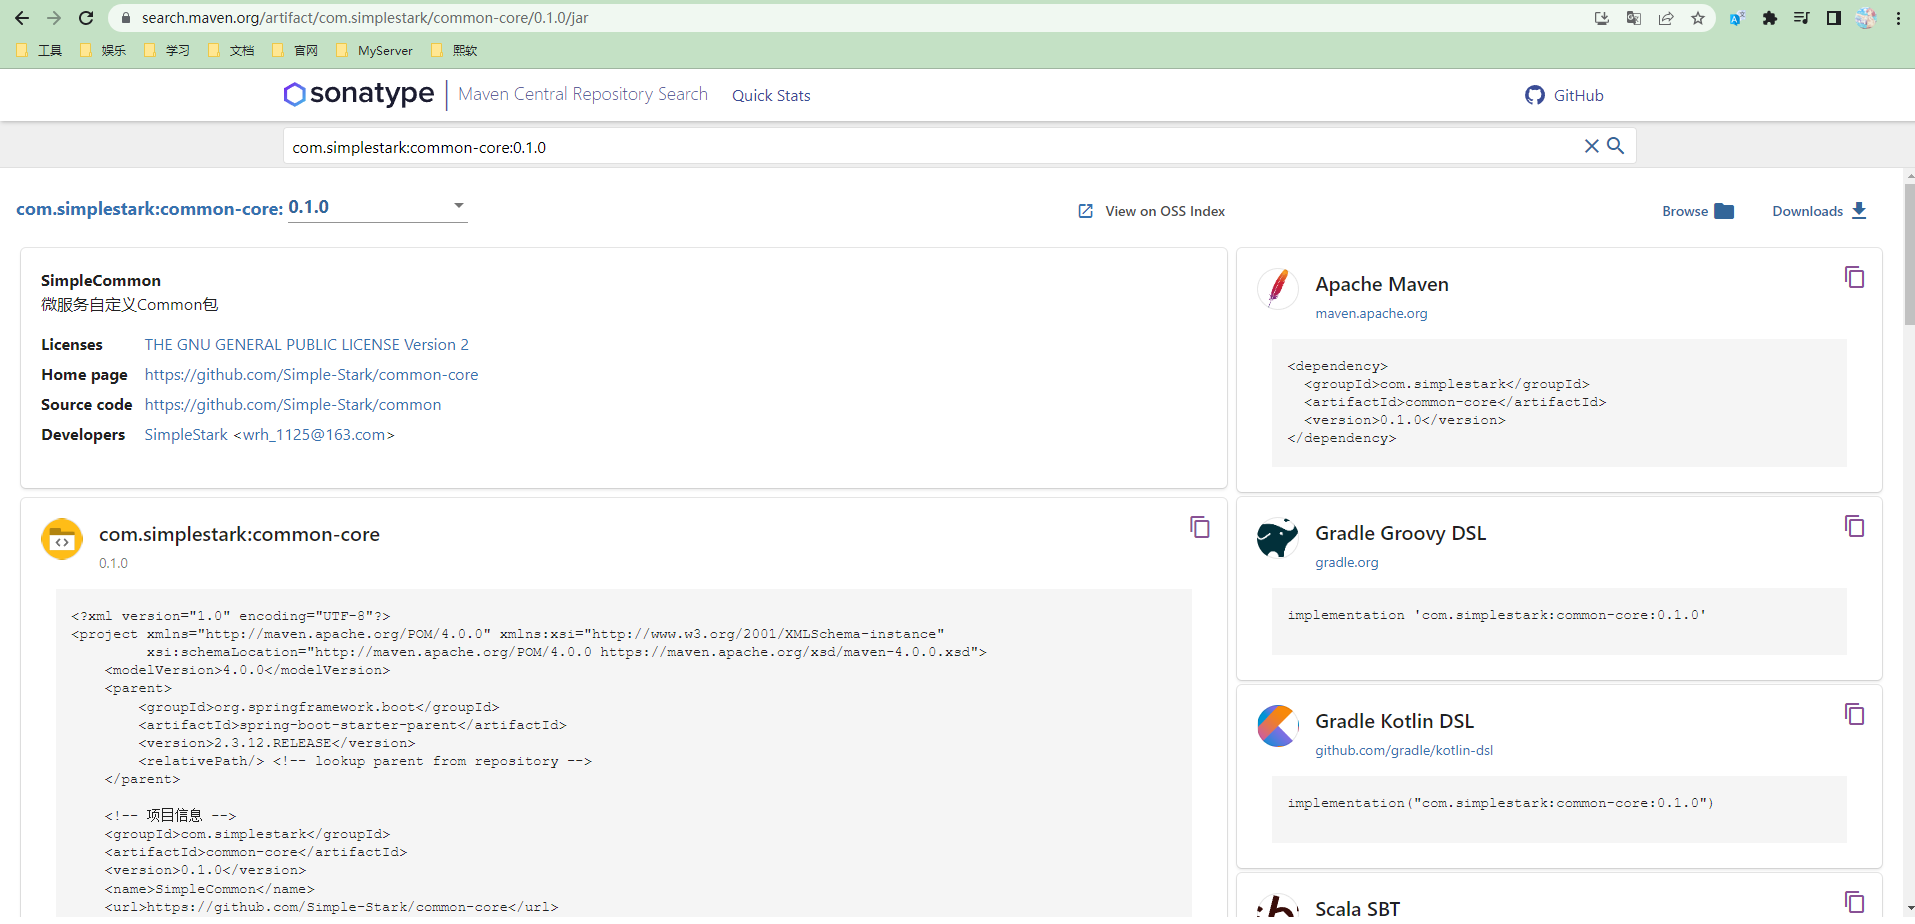
耐心等待一段时间可以看到依赖已经发布到了中央仓库,代码中可以直接引用了。
后记
以上就是如何将自己的依赖包发布到Maven中央仓库的大致步骤,博主也是基本上按照官方文档进行的操作,过程中也遇到了一些问题,这里就不再赘述,希望读者可以积极到搜索引擎上寻找答案,这样会更有成就感。
以上!
参考链接
https://central.sonatype.org/publish/publish-maven/
https://central.sonatype.org/publish/requirements/gpg/#review-requirements

